Monday, 29 September 2014

Battle of McDowell

Battle of McDowell – 15mm ACW Scenario
May 8th 1862, 3.00pm – 4.30pm (9 turns)

Following his defeat at Kernstown, Jackson takes his command down the valley in an effort to destroy the Union forces advancing from West Virginia. On the morning of May 8th he comes up against Milroy’s brigade barring his way across the Bull Pasture River and orders his men to occupy Sitlington’s Hill.

Meanwhile Schenk arrives at McDowell with his own brigade and being senior to Milroy takes command. Concerned that the Rebels may try to place guns on the hill that would dominate the river crossing, Schenk and Milroy agree to launch a spoiler attack. In reality Jackson decides that it is impractical to place any artillery on the hill and his guns are left in the rear.

The action starts at 3.00pm as Milroy personally leads the Union forces in an attack on Sitlington’s Hill. The Union player must achieve a victory by 4.30pm or the Confederates will receive substantial reinforcements and the game will end in a Rebel victory.

 Initial deployment of the forces - click on the image to zoom in.

Order of Battle

Union Forces
Milroy’s Brigade
3rd West Virginia – Thompson (8)
82nd Ohio – Cantwell (12)
32nd Ohio – Swinny (10)
25th Ohio – Richardson (12)
75th Ohio – McLean (8)
12th Ohio artillery (2 guns)

Schenk’s Brigade (all units in fixed positions)
55th Ohio
73rd Ohio
1st Ohio artillery (5 guns)

Confederate forces
Stonewall Jackson
Gen Johnson (Conner’s Brigade, Army of the North-West)
12th Georgia – Hawkins (14)
31st Virginia – Jackson (10)
25th Virginia – Smith (10)
44th Virginia – Cobb (12)

(number of stands in brackets)

Victory Conditions
Sitlington’s Hill – 2VP’s are awarded for each unbroken Union regiment on the hill (all stands must be on the hill to qualify).
2VP's for each enemy unit routed.
2VP’s for each enemy brigadier killed
1VP for each enemy stand removed.
The first player to amass 10 VP's wins the game. If there is no clear winner by the end of Turn 9 the game ends in a Confederate victory.

Troop Experience Levels
Each player secretly rolls a D6 for each regiment at the start of the game and allocates experience levels as follows:
Confederates: 1,2,3,4, = hardened, 5,6 = veteran
Union: 1,2 = green, 3,4,5,6 = hardened

Leader Ratings
These are diced for by both sides as follows:
1 = poor (Confederate = unpredictable) 2,3 = unpredictable 4,5 = dependable 6 = bold

Special Rules
1. The 12th Georgia are armed with smoothbore muskets – normal firing rules apply but they are restricted to a maximum range of 200yds.
2. The Union artillery and infantry on and around Cemetery Hill and are tasked with defending the river crossings and may not move.
3. Milroy led the Union attack in person – to represent his exposure to danger Milroy must be attached to a unit at all times (he can change between units and can still exercise normal command of the whole brigade. If the brigade he is attached to is broken and he fails to rally it his command figure becomes a casualty).

Thursday, 25 September 2014

Kernstown – turns 5-8

Dave’s artillery continued to shower the 1st West Virginia with canister but despite this their morale held and the lads were able to reply with close range rifle fire. In the end it was the artillery whose nerve broke first and the guns were forced to limber up and retreat back down the Laurel Grove Road.

The 1st West Virginia see off the West Augusta artillery (you can just see a limber sneaking off between the buildings!).

 The 37th Virginia having turned the Union right flank settle down behind a rail fence to exchange shots with the 7th Ohio.

Meanwhile the battle in the centre of the field was intensifying and Dave took the decision to carry out a passage of lines by pulling back the worn out 4th Virginia through the advancing ranks of the 27th Virginia. At this point Dave revealed that the 27th were a 'veteran' unit and they were at full strength having been shielded from shot and shell by the ranks of the 4th.

The veterans of the 27th Virginia prepare to swop places with the rather jaded men of the 4th Virginia.

The 23rd Virginia belatedly get to grips with the 1st West Virigina near the Glass Farm.

 The Rebs got the best of a duel between skirmishers on the Union left flank but this had little impact on the outcome of the battle.

I was a bit nervous about being confronted by fresh ‘veterans’ particularly as both my regiments lining the wall opposite them were ‘green’. However I needn’t have worried because the Virginians stepped forward into a cauldron of fire from 13 infantry stands and my artillery and they were soon dropping like flies.

 As the 27th Virigina advanced they were greeted with a solid wall of flame from the Union line (+1 for resting weapons!).

As we moved to the morale phase at end of turn 8 it was crunch time with all the front line units having to test. My 1st West Virginians broke under the flanking fire of the 23rd Virginia but Dave suffered a worse result with both the 33rd and 27th Virginia taking to their heels.

The Rebel line starts to crumble...

...and then breaks completely (Dave has even added the correct regimental name to the flag of the 33rd VA - nice touch!).

So at the end of turn 8 the Union had amassed 11 VP’s (2 broken enemy infantry units, 1 broken enemy artillery battery, 4 enemy stands removed and possession of the Stone Wall) whilst the Confederates had only 4 VP’s (1 broken enemy unit, 2 enemy stands removed) – a convincing win for the North!

 The positions of the units at the end of the battle - turn 8 (click the image to zoom in).

Next game will be another of these 15mm ACW ones as we have been enjoying playing them and the rules are now 99% there. Meanwhile the flocking of the 1/300th armies continues – we hope it will all be over by Christmas!

Sunday, 31 August 2014

Kernstown – turns 1-5

As this was to be an encounter battle we started the game without specific orders issued to individual regiments and with all units deployed in field column. We agreed that orders could only be issued once the two sides had spotted each other, which under the rules would occur at a distance of 1,000yds, line of sight permitting.

Tyler's brigade on Sandy Ridge.

Garnett's brigade hurry forward 'on the double'.

"Come on boys, lets get them Rebs!"

I quickly moved my columns down from Sandy Ridge with the intention of heading directly towards the stone wall whilst Dave pushed his Rebels forward from the opposite direction. By the end of turn 1 most of the troops were visible to both sides and we began to issue orders.

Garnett's brigade occupies the high ground south of the stone wall.

 The Union troops move forward towards the stone wall.

I ordered the 110th Pennsylvania and 7th Indiana to form line and then to press on quickly to take the wall where the skirmishers of both sides were already in action. To my surprise though Dave halted the bulk of his forces on the high ground south of the wall and deployed the 4th Virginia into a single line.

Tyler deploys his brigade into line.

 The 4th Virginia deploy into a single rank opposite the stone wall.

Dave's decision not to advance further gave my forces an important tactical benefit as my troops would receive a morale bonus for ‘hard cover’ as well as increased fire power for ‘resting weapons’. The Confederates on the other hand would receive a morale bonus for ‘high ground’ and were able to bring maximum fire power to bear from the 4th Virginia whilst keeping their reserves intact.

The battle-lines now fully deployed are starting to engage in a fire-fight.

General Garnett (looking suspiciously like Robert E Lee) takes up position behind the 4th Virginia.

Meanwhile Dave had ordered the 37th Virginia supported by the West Augusta artillery to advance into the wheat field in an attempt to turn my right flank. It was a bold move to bring artillery so far forward (something I had tried successfully in the last game) and soon the Rebel guns were blasting the ranks of the 1st West Virginia regiment with canister.

The West Augusta artillery unlimbered by the Glass Farm and about to fire cannister at the 1st West Virginia.

 Meanhwhile the 37th Virigina are trying to sneak around the Union right flank.

The situation at the end of our playing session half way through turn 5 (click on the image to zoom in).

To be continued.

Sunday, 24 August 2014

Battle of Kernstown

Battle of Kernstown - 15mm ACW Scenario
March 23rd 1862, 3.00pm – 5.00pm (12 turns)

Jackson advances directly up the Valley Turnpike with the aim of surprising and defeating what he believes to be a single Union brigade at Kernstown. In fact the town is defended by an entire Union division under the temporary command of Col. Nathan Kimball.

During the morning Jackson attacks the Union line in front of the town but is checked and pushed back. Realising he can make no headway by a direct assault he decides to shift the bulk of his forces to his left in an effort to turn the Union right flank. This scenario is based very loosely on the action that followed.

The Confederate brigades of Fulkerson and Garnett are advancing with the aim of gaining the high ground of Sandy Ridge. At the same moment Tyler’s Federal brigade arrive to shore up the Union flank. All units begin the game in field column with artillery batteries limbered.

 Initial deployment of the forces - click the image to zoom in.

Order of Battle

Union Forces 
Third brigade (Col. Erastus Tyler)
1st West Virginia – Thoburn (10)
110th Pennsylvania – Lewis (12)
7th Ohio – Creighton (10)
7th Indiana – Cheek (14)
29th Ohio – Buckley (8)
4th US artillery

Confederate Forces
Fulkerson’s brigade
37th Virginia – Carson (10)
23rd Virginia – Taliaferro (12)
West Augusta artillery
Garnett’s brigade
4th Virginia – Ronald (14)
27th Virginia – Echols (10)
33rd Virginia – Cummings (8)

(the number of stands in each unit are given in brackets)

Victory Conditions
The Stone Wall – 2VP’s are awarded for control of the wall.
Glass Farm – 2VP’s
Sandy Ridge – 2VP’s for each Confederate brigade that reaches the ridge.
Marcauley House – 2VP’s for each Union brigade that reaches the house.
2VP's for each enemy unit routed.
1VP for each enemy stand removed.
The first player to amass 10 VP's wins the game.

Troop Experience Levels
Each player secretly rolls a D6 for each regiment at the start of the game and allocates experience levels as follows:
Confederates: 1 = green, 2,3,4,5 = hardened, 6 = veteran
Union: 1,2 = green, 3,4,5 = hardened, 6 = veteran

Leader Ratings
These are diced for by both sides as follows:
1 = poor
2,3 = unpredictable
4,5 = dependable
6 = bold

Sunday, 10 August 2014

Henry Hill – Conclusion

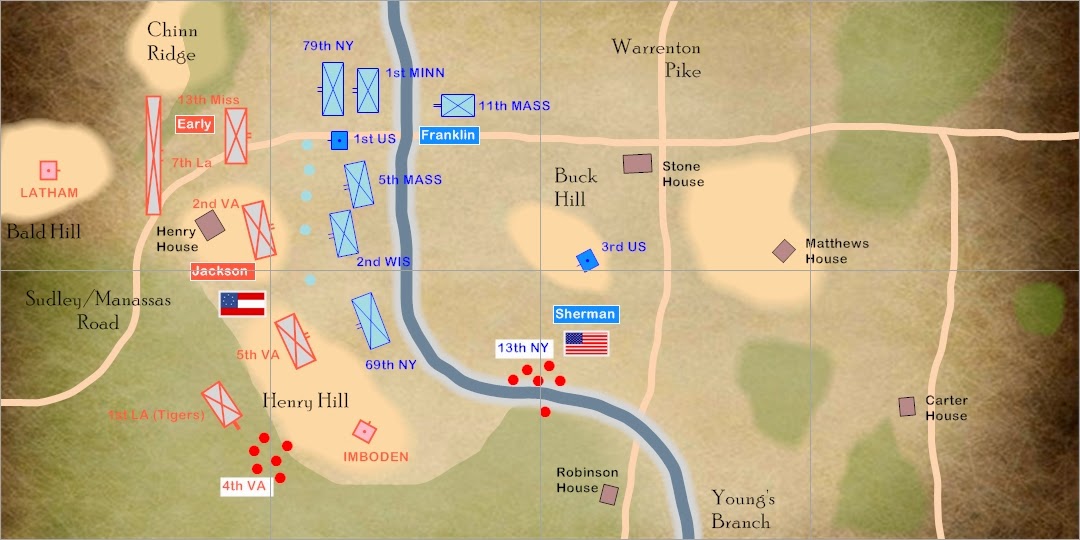
In the centre of the field the 2nd Wisconsin and 5th Massachusetts were now side by side and able to trade volleys with Dave’s 2nd Virginia on equal terms. The 2nd Virginia had started out as the largest unit on the table with 14 stands and I would have to bring every available Union rifle to bear if the Rebels were going to be shifted from Henry Hill.

Still standing like a stone wall - Jackson with the 2nd Virginia by Henry House.

The two sides blazed away but it was my Federals who blinked first as the 5th Massachusetts failed their morale test at the end of turn 9 and headed for the rear. With my left and centre in disarray any hope of a victory now shifted to the outcome of events on the right.

 The 5th Massachusetts break under the fire of the Virginians.

Since the start of the game I had been painstakingly manoeuvring the 79th New York forward on the extreme right of my line. They had experienced more than their fair share of disorder, firstly as a result of crossing Young’s Branch, and then due to the steadily rising number of casualties inflicted on them by the Confederates (for each 5 casualties suffered a unit must test for possible disorder). Now at last they were in a position where they could start to exchange volleys with the 13th Mississippi near Chinn Ridge.

The 79th New York square up to the 13th Mississippi near Chinn Ridge.

It seemed that the battle would be decided in this final fire-fight between the New York ‘highlanders’ and the southern boys from the ‘Muddy Miss’. In the end it all hinged on the round of morale throws at the end of turn 10 and it was the Rebels who emerged victorious as the 79th took to their heels in the last skedaddle of the day.

Game over - the 79th join the great skedaddle!

"Hey boys, last one back to Willards Bar is buyin'!"

At the end of turn 10 Dave had amassed 13 VP’s to my 7 VP’s a convincing win for the Confederates. Almost half of my infantry were now in full rout and they didn’t look as if they were going to stop running until they reached Capitol Hill. It was starting to look as if this would be a very long war.

 As the sun sinks over the horizon the Union army is in full retreat - this will be a long war...

We both felt that the rules had delivered an excellent game in what was a very simple scenario - basically one brigade in line advancing against another. The tactical detail involved in manoeuvring units and trying to get to grips with the enemy offered us a completely different experience from the army level 1/300th games we are used to, which was the whole idea. The only down side was the amount of paperwork we found ourselves doing but we have already had ideas about how to streamline that. We intend to try another scenario with the revised rules soon but I will probably write it up as a single post as I’m aware that the slow pace of a game like this makes multiple posts less interesting to the reader!

The positions at the end of the game - turn 10 (click the image to zoom in).

Tuesday, 29 July 2014

Henry Hill – turns 6-8

By the end of turn six I was able to concentrate the fire of 4 Union regiments against Dave’s line of 3 Confederate regiments. In addition the 1st US artillery was now ideally placed to open a destructive fire on the newly arrived 13th Mississippi. It looked as if I might be able to shift the enemy from Henry Hill by weight of fire-power alone.

The battle in full swing (view from behind the Union right flank).

 The 1st US artillery blazes away at the 13th Mississippi.

But of course it was never going to be that simple and the situation changed quite dramatically at the end of turn seven when the 69th N.Y. failed their morale test and routed (they had been exposed to an enfilading fire from Imboden’s battery on Henry Hill as well as being at the receiving end of volley fire from the 5th Virginia to their front). With the 13th N.Y. having failed to rally, my entire left flank had disintegrated!

The irishmen of the 69th N.Y. skedaddle.

Meanwhile across the battlefield my troops were starting to stack up behind the 79th N.Y. where the lack of space (and command points) was hampering deployment. Dave chose this moment to deploy more skirmishers and these emerged from the tree line on Chinn Ridge and pitched into my own skirmishers who they quickly eliminated.

The skirmishers clash in front of Chinn Ridge.

In the confusion of battle the 79th N.Y. accidentally stray in front of the 1st US artillery masking their guns.

It was all starting to look bad for the Union but then a stroke of luck – Sherman was in a position to be able to reach the 69th N.Y. and attempt to rally them (We only allow a unit one chance to rally and this can only happen if a general officer is present) and with a die roll of 5 this is exactly what he did. Disaster had been averted – for the moment at least.

Sherman rallies the 69th N.Y. - hurrah!

 Unfortunately there was no stopping the 13th N.Y. who by now were passing the Robinson House well on their way to Washington!

At the end of turn eight the Union have 6 VP’s and the Rebels have 5 VP’s – still a close run thing but remember if I haven’t won by the end of turn 12 the game will be deemed a Confederate victory.

The situation at the end of turn 8 (click on the image to zoom in).

Tuesday, 22 July 2014

Henry Hill - turns 4–6

The Union battle-line continued to close in on the Rebels occupying Henry Hill but as each unit crossed the line of Young’s Branch they had to test to see if they became disordered and this had the effect of slowing down the advance. In the real battle Young’s Branch is not mentioned as being much of an obstacle and I was beginning to wish that I had made it so in this scenario!

The 69th N.Y. become disordered as they cross Young's Branch.

The 1st Minnesota come up behind the 79th N.Y. (who were also disordered crossing the stream).

As the Union troops struggled on towards the foot of Henry Hill, Early was bringing his brigade forward on the Confederate left so that the Rebel line now stretched unbroken to Chinn Ridge. Latham’s battery was deployed on Bald Hill where it started to bombard the troops on my right who had previously enjoyed the luxury of advancing unhindered by artillery fire.

Early's men move into the gap between Henry House and Chinn Ridge.

 The 5th Massachusetts decided to cross the stream in field column formation to avoid the possible disorder penalty and increase their movement rate.

Finally the two battle-lines were close enough for the Confederates to start blazing away with their rifled muskets and casualties started to mount in the Union ranks. A stationary unit with sufficient CP’s can fire up to 3 times per turn and Dave’s Confederates were soon using this ability to full advantage.

The Confederate line on the high ground opens fire on the advancing Union troops.

Having spent much of the battle trying to advance obliquely across Young’s Branch, the 13th N.Y. had suffered more than most from disorder and now as they finally emerged onto firm ground they found themselves under the muzzles of the guns of Imboden’s battery. The result was as you might expect – the 13th N.Y. became the first unit to skedaddle!

Sherman rides over to try and rally the 13th N.Y.

However, by one of those flukes that can happen in simultaneous movement games, their opposite number on top of Henry Hill – the 4th Virginia – chose the same moment to take the quickest road back to Richmond (to be fair though they had suffered a continuous drain of casualties from the fire of the 3rd U.S. artillery on Buck Hill).

 The 4th Virginia take to their heels and make off towards Richmond!

So, at the halfway point of turn 6, the battle is now in full swing and fairly evenly matched – my Union troops have 2 VP’s and Dave’s Confederates have 3 VP’s.

The situation halfway through turn 6 (click the image to zoom in).