Tuesday 17 December 2013

Operation Newmarket – turns 4-5

At the start of turn 4 the British airborne assault finally arrived. Dave chose the area east of the River Orbec for the parachute drop whilst landing his two gliders (containing anti-tank guns and 2 sections of commandos) on the open heath on the western side of the river.

The parachute drop - figures that landed in the river or off table were given a fifty percent chance of surviving.

Our method for making the parachute drop was for Dave to release 2cm square pieces of tissue paper from a box held 5 foot above the table – one for each figure – we then placed the figures wherever the pieces of paper landed. Considering the restricted area that was chosen for the LZ surprisingly few paratroopers were lost in the river or off-table, a total of seven casualties resulted from a force of just over fifty.

The paratrooper officers and NCO's hurriedly assemble their men following the drop.

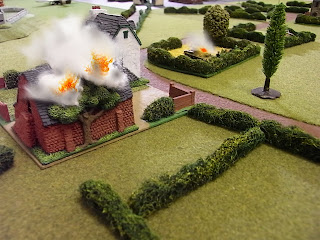
Meanwhile the British infantry and supporting armour were putting pressure on the German defenders of Ferme de la Blanc as Dave realised he would have to keep moving if he was to achieve his objective. Mortars set the barn on fire forcing the surviving German infantry to withdraw while 3 Sherman tanks, under cover of a smoke screen, rushed the Panther tank that was lurking in the field behind Hill 112. The Panther was forced to pull back rather than risk the Shermans emerging from the smoke to take a shot at its vulnerable flank.

 The British mortars are now in action whilst the infantry and tanks continue to advance.

 A direct hit on the barn by a mortar causes several German casualties.

The surviving Germans beat a hasty retreat from the farm.

As one Sherman lays down a smoke screen three others take advantage of the cover and close in on the Panther.

At the same time another column of British tanks was making its way along rue Choisy towards Hameau Choisy. This column was led by two Sherman Fireflies and as the lead tank rounded a bend in the road the radio crackled with a report (from a scouting Stuart light tank) that another Panther had been spotted at the cross roads in the middle of the hamlet. The Firefly took a quick shot on the move straight along the road and with a couple of lucky die rolls reduced the Panther to a heap of burning metal. The luck of the Brits was holding.

 The second British armour column approaches Hameau Choisy.

 The leading Firefly takes a nifty shot on the move and...

...knocks out the Panther before it can return fire.

Back at the LZ almost as soon as the paratroopers had landed a group of 3 German Tiger tanks arrived in front of Hill 167 and began engaging the paratroopers and gliders with HE and machine gun fire. Dave optimistically chose to drive his jeeps towing the anti-tank guns directly towards this threat having been told by me that he would have to “get in close” to stand a chance of taking the Tigers out. It remains to be seen whether this unorthodox tactic will work!

Tiger tanks supported by panzer grenadiers in half-tracks arrive just in time to engage the airborne troops on their landing ground.

 The only thing better than a Tiger tank (for the German player) is two Tiger tanks!

The situation at the end of turn 5 (click on the image to zoom in).

Friday 6 December 2013

Operation Newmarket – turns 1-3

The British player’s objective in this game is to gain control of both the town of St Arnault and the bridge over the river Orbec by the end of turn 16. On the face of it this seems like quite a tall order especially as Dave isn’t familiar with either the period or the rules and all the German troops start the game concealed (no prizes for guessing who came up with the scenario!).

A Typhoon flies low over St Arnault on a reconnaissance mission but spots nothing - the Jerries must be hiding!

Despite his lack of detailed WWII knowledge Dave began the game by craftily holding back his airborne elements and keeping me guessing about where and when they would arrive. At the same time he pushed his reconnaissance group tentatively along the rue St Arnault towards the Ferme de la Blanc.

The recon section supported by three Stuart tanks move up towards the Ferme de la Blanc. 1st platoon are advancing on foot behind them.

The company heavy weapons sections are travelling in half-tracks on the road whilst the PBI move across the fields.

The recon group soon spotted the presence of a Stug III assault gun and a squad of German infantry in a field to the right of the farm. A call over the radio for artillery support was promptly answered (due to a lucky die roll) with a barrage that neutralised both threats. First blood to the Brits!

 A British artillery barrage takes out the German assault gun and half a section of infantry - good shooting!

This prompted the Germans to retaliate with everything they had which included an anti-tank gun and a Panther tank. The lead Stuart tank was quickly brewed up and a second one had a lucky escape when an AP round from the Panther bounced off it. Dave sensibly took his lightly armoured Stuarts off the road and into the safety of the dead ground behind Hill 112 while moving a group of four Shermans up to deal with the threat.

A concealed German anti-tank gun opens up on the British tanks.
 
The view from behind the German lines showing the 'brewed up' Stuart on the road.

 Here come the Shermans! The bridge looks a long way off - perhaps too far?

Meanwhile a British infantry company had been slowly moving up behind the advancing tanks on foot with their heavy weapons riding in half-tracks. The reconnaissance section and the mortars now de-bussed from their vehicles and an exchange of small arms began with some German infantry that had been spotted in the farm. Dave’s first platoon continued to move forward in support whilst his second platoon headed for Hill 112.

1st platoon head on up towards the farm whilst the Shermans go off road to avoid the enemy anti-tank gun.

 2nd platoon are nearing Hill 112 - the Stuart tanks are already there sensibly evading a Panther tank lurking in the fields beyond.

So our first session of the game ended with the completion of turn three, not bad going as we both had to get to grips with the rules. The map below shows the area of the action so far (for the full table map click here).

 Click on the image to zoom in.

All the troops, tanks and vehicles used in this game are from the superb Wargames South range of 1/200 figures (the aircraft are by Skytrex).

Sunday 24 November 2013

Operation Newmarket

And now for something completely different – a change of scale and period to 1/200th WWII. The next game will be set ‘somewhere in Normandy 1944’ and will feature a British battle-group, supported by an airborne element, trying to capture the fictional town of Saint-Arnault and or course a vital river bridge!

A few years back I started collecting late war figures and armour from the excellent Wargames South range with the idea of playing some solo WWII games. The scale of these figures is such that they are detailed enough to be recognised individually but are still small enough to allow a large playing area to be represented on a wargame table. I also wrote my own set of rules for playing these games called ‘COMBAT!’ which we will be using to fight the game.

Operation Newmarket - area of operations (click on the image to zoom in)

In the forthcoming game I will play the defending Germans and Dave will play the British whose ground units will enter from the north side of the table with the airborne troops free to land wherever he can find a suitable space!

Friday 1 November 2013

Randolph’s Ferry - Conclusion

As the sun came up on day three, November 12th 1862, my Union army was exhausted having taken nearly twice the number of casualties as the Rebels over the previous two days of fighting. Overnight we had both made some small adjustments to our lines with Dave conceding half of West Ridge to Thomas’ men and allowing Sheridan’s division to keep a precarious foothold on the extreme west end of Black Elk Mountain.

Sunrise - General Thomas readies his corps for a third day of fighting (looking due west from behind West Ridge).

Crucially though, although all units recovered to good morale overnight, Dave had more units permanently removed from play than I had. At the start of every game each of our armies are given a ‘Army Demoralisation Level’ (DM) in this case it was 6 for the Union and 7 for the Confederates. If at any point during play the number of simultaneously broken units of one side equals or exceeds their DM the game ends immediately in a victory for the other player.

Dave allowed me to move my HQ and wagon park forward overnight to reduce the three mile hike my wagons had been making to re-supply McCook - very sporting of him!

We allowed some very limited SP recovery during the night turn but this card still came in very handy when Dave played it to help reinforce Cleburne's veterans on Black Elk Mountain.

The fighting resumed at first light but with many of my brigades seriously depleted I had cancelled all ASSAULT orders and replaced them with HOLD or ENGAGE. Brigades with ASSAULT orders are committed to closing with the enemy and attacking with the bayonet but my troops simply did not have the strength points left to succeed at this. I decided therefore to hang on and let Dave take the initiative in the hope I could break his army with rifle and artillery fire.

 The fighting resumes - Thomas and McCown square up for round two on top of West Ridge.

Dave however had decided that his best chance of victory was to order assaults with Cleburne’s division on Black Elk Mountain and McCown’s on West Ridge. The Rebs came forward and soon both sides were hotly engaged once again.

 This card helped Cleburne's veterans to clear Sheridan's division from its foothold on Black Elk Mountain.

The Rebs are now firmly back in control of Black Elk Mountain having pushed Sheridan's men back towards Stone Creek.

Cleburne’s veterans succeeded in ejecting Sheridan’s men from the mountain and soon Thomas too was under pressure, his men just managing to cling on to the eastern edge of West Ridge. At this point I was seriously considering throwing in the towel as a win now seemed out of my grasp but the troops kept at it and suddenly I realised that Dave was only one DM point away from breaking!

The Union front line on West Ridge is broken once more in the continuing 'see-saw' battle.

The boys in blue break but there are plenty of supporting brigades coming up and those running down the hill quickly reform once out of range of the Rebel guns.

Davis' brigade plugged away all morning at Breckinridge's Confederates and were eventually rewarded with the sight of a broken enemy brigade fleeing their entrenchments.

The end came at 9.30am (turn 46) when Wood’s brigade of Cleburne’s division were broken by fire on the slopes of Black Elk Mountain taking the Confederate DM to 7. Incredibly, and against the odds, Rosecrans had achieved a victory – Bragg’s army was defeated and Franklin was in Union hands…

Game over - Wood's brigade break and tip the Confederates over their army DM level. By co-incidence Wood's brigade also broke on day one during the fighting at Mt. Zion Church - I guess they don't make veterans like the used to!

 Thomas' men stream over West Ridge to liberate the town of Franklin from the Rebel yoke.

 The situation at the end of play (click on the map to zoom in).

The armies will now retire to winter quarters where a major re-fit is planned ready to resume campaigning in the spring. In the meantime keep an eye on the blog as we hope to play another AWI game and maybe try something new as well!

Saturday 19 October 2013

Randolph's Ferry - Turns 36-41

On the first day of this scenario Ian had to rethink his plans in the face of Bragg's unexpected line of heavy fortifications. He had a major success in driving away Cleburne's division from Mt. Zion Church, and after a bit of a false start came up with an effective artillery strategy -  parcelling out long range guns across the entire front, and deciding to push 12 pdr batteries right up close to our lines in support of any assaults. Crittenden's big attack had failed in the morning of day two, and now it was McCook's turn to put pressure on the Rebel left at Black Elk Mountain.

McCook's men engage the Rebs on the slopes of the mountain.
McCook did not have assault orders as his mission was to keep Bragg occupied while the main Union attack on West Ridge was driven home. But he engaged us ferociously - General Breckinridge was shot dead at 4:30pm as he rode up and down to inspire the thinning grey ranks to hold the line.  Dibrell's dismounted cavalry brigade was soon put to flight, leaving Robertson's isolated horse artillery battery holding off the attentions of a whole Yankee division on the extreme Rebel left.


Robertson's battery - temporarily out of ammo but standing firm
 and seemingly bulletproof !

McCook's corps is now miles from the Union wagon park and re-supply is a headache.
If Ian hadn't routed my rifled guns I would be lobbing shells at this lot !

It was now mid-afternoon and Thomas' corps had struck the Confederate centre and overwhelmed the artillery positions. There followed a couple of hours of classic, dramatic Civil War back-and-forth infantry action to secure the bloodsoaked soil of West Ridge.


Thomas storms the West Ridge breastworks - it's all or nothing, Rosecrans
doesn't have enough resources remaining to try again ! 

The Federal troops that overran the guns are themselves routed
 as Confederate reserves move up.
Fresh Yankees take their place ...... Union Generals Fry and Negley
both take risks, and Fry is wounded.

Tactical card played by Scribner's brigade at 4:00pm, resulting in a loss
of a massive 6 strength points from Mercer's Reb brigade.
  
Scribner's men subsequently rout - but Spear's brigade comes up and it's the turn
of the weary Rebs to skedaddle. 

'A' grade corps commander, General Hardee, takes a mortal wound in the chaos of this see-saw struggle and in the end Union forces dominate the crucial West Ridge as twilight causes the fighting to fizzle out. They have also managed to get a foothold on Black Elk Mountain as a second night descends on the battlefield. Bragg's reserves have now been forced into a desperate new defensive posture to deal with whatever the Army of the Cumberland may throw at them on day three !

Confederate line across the old Pine Trail

Loring's division forms a new position around the perimeter of Franklin, close
 to the HQ of an increasingly nervous General Bragg !

Nightfall - Nov 11th (day two)

As we concluded turn number 41 (yes, count 'em, 41 turns!) and prepared for another night turn
the Confederate DM level stood at a precarious 5.5 ... just one and a half points from total defeat.
The Union level was a much safer 3.5 and stands as a tribute to Ian's tactical skill in turning around what looked like am impossible situation for the Army of the Cumberland ! 

Friday 11 October 2013

Randolph’s Ferry – Turns 28-35

At the start of our fifth playing session on Wednesday night I think we were both feeling that the game had reached a stalemate as it looked very unlikely that I could make any headway against Dave’s entrenched Rebel line. Crittenden’s corps had been convincingly repulsed by Polk’s men at Ranes Farm and was now in full retreat with 4 broken brigades, fortunately for me these brigades started to rally as soon as they were out of range of the Confederate artillery.

The final moments of Crittenden's attack - due to poor command die rolls it took some time for the order to disengage to filter down to brigade level.

Crittenden's new line at the Conrad House - all but one of his brigades have rallied. For a while the Union DM level reached 4.5 - at 6 the Union army would have been defeated.

By now it was early afternoon and Rosecrans needed a new plan (and a bit of good luck) if the Union flag was every going to fly again over the town hall at Franklin. I realised that Crittenden’s corps was too weak to make any further assaults and he was ordered to hold a line at the Conrad House whilst detaching Rousseau’s fresh division and sending it back to Thomas. The plan now was for Thomas to attack Bragg’s centre at West Ridge but for this to have a chance of succeeding, McCook would have to pin the Rebel left at Black Elk Mountain.

A single brigade of Wheeler's cavalry hold the extreme left of the Confederate line near Leggetts Mill. The remainder of his division can be seen in reserve behind Black Elk Mountain.

McCook's corps start to move forward towards Black Elk Mountain. Most of his brigades suffered casualties in the fighting at Mt Zion Church on the 10th and are no longer in condition to assault the Confederates but they can still mount an effective diversion.

Another view of McCooks men advancing - due to a slight screw up I was late deploying skirmishers and they had little effect on Wheeler's dismounted troopers.

The front line is now close enough to engage in a fierce fire fight with Breckinridge's infantry. I have moved all my available batteries within cannister range to support the attack. This may lead to ammo problems later as my wagons are having to make a five mile round trip from the wagon park to re-supply the guns.

With so much of the Union army in motion Bragg was desperate for information. This picture shows three Rebel couriers converging on his HQ at Franklin with urgent reports from all corners of the battlefield!

Thomas’ three divisions now moved forward across ‘the valley of death’ between Laurel Heights and West Ridge, the area dominated by the Confederate Grand Battery. The Rebel guns exacted a heavy toll on the Union infantry and soon four of Thomas’ nine brigades were shaken and unable to advance but the remaining Federal troops pushed forward determinedly right up to the enemy line.

Thomas' corps (in the foreground) begin their advance towards West Ridge. The troops on the other side of the Old Pine Trail (right distance) are McCooks.

The view from the extreme left of Crittenden's line as Thomas goes forward in the background. Crittenden has taken the precaution of ordering Palmer's 'green' division to entrench in case Polk attempts a counter-attack.

Thomas' men are starting to take casualties from the Rebel 'grand battery' on West Ridge.

Rousseau's division is on the left with Fry's on the right. The Confederate position looks unassailable.

It seemed an impossible task to get a brigade up the slopes of West Ridge to eject the Rebel guns from behind their entrenchments but in the end it all came down to one simple die roll – 4,5 or 6 and Dave’s guns would be safe, 1,2 or 3 and Morton’s brigade would be in the redoubt!

Against the odds Morton's brigade charges forward and takes the Rebel works. A great cheer goes up from the Federal infantry...

Well, the boys in blue did do the impossible and two of the Confederate batteries were immediately routed, Bragg’s centre was suddenly looking decidedly less secure.

The situation at the end of Turn 35 (3.00pm November 11th) - this is now officially the longest running table game we have ever played!

One of the great things about our rule set (even if I do say so myself) is that it recreates the see-saw nature of Civil War battles and this game has certainly rocketed out of the doldrums to become another nail-biter. At this stage the game could go either way…