Tuesday 29 July 2014

Henry Hill – turns 6-8

By the end of turn six I was able to concentrate the fire of 4 Union regiments against Dave’s line of 3 Confederate regiments. In addition the 1st US artillery was now ideally placed to open a destructive fire on the newly arrived 13th Mississippi. It looked as if I might be able to shift the enemy from Henry Hill by weight of fire-power alone.

The battle in full swing (view from behind the Union right flank).

 The 1st US artillery blazes away at the 13th Mississippi.

But of course it was never going to be that simple and the situation changed quite dramatically at the end of turn seven when the 69th N.Y. failed their morale test and routed (they had been exposed to an enfilading fire from Imboden’s battery on Henry Hill as well as being at the receiving end of volley fire from the 5th Virginia to their front). With the 13th N.Y. having failed to rally, my entire left flank had disintegrated!

The irishmen of the 69th N.Y. skedaddle.

Meanwhile across the battlefield my troops were starting to stack up behind the 79th N.Y. where the lack of space (and command points) was hampering deployment. Dave chose this moment to deploy more skirmishers and these emerged from the tree line on Chinn Ridge and pitched into my own skirmishers who they quickly eliminated.

The skirmishers clash in front of Chinn Ridge.

In the confusion of battle the 79th N.Y. accidentally stray in front of the 1st US artillery masking their guns.

It was all starting to look bad for the Union but then a stroke of luck – Sherman was in a position to be able to reach the 69th N.Y. and attempt to rally them (We only allow a unit one chance to rally and this can only happen if a general officer is present) and with a die roll of 5 this is exactly what he did. Disaster had been averted – for the moment at least.

Sherman rallies the 69th N.Y. - hurrah!

 Unfortunately there was no stopping the 13th N.Y. who by now were passing the Robinson House well on their way to Washington!

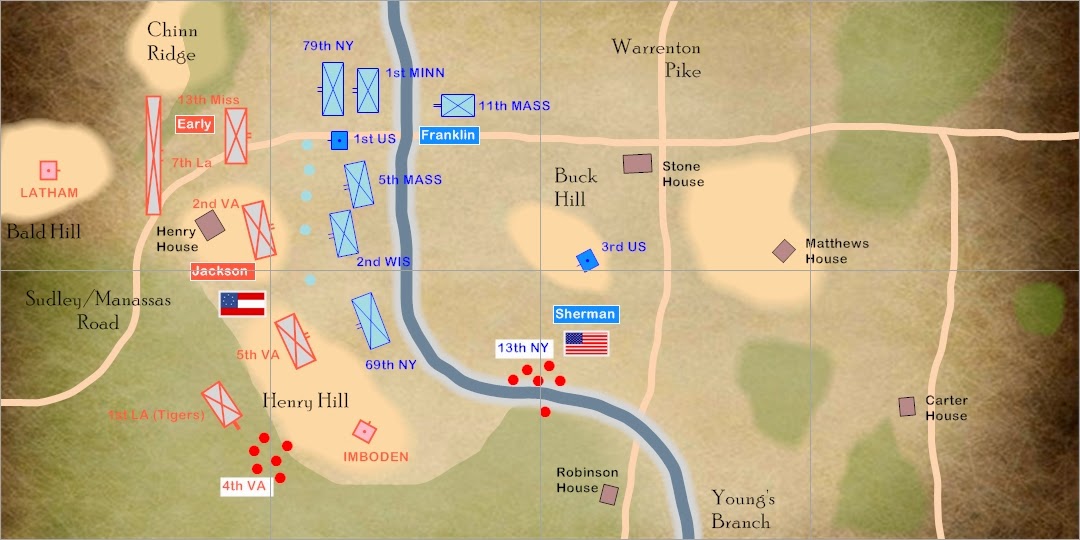
At the end of turn eight the Union have 6 VP’s and the Rebels have 5 VP’s – still a close run thing but remember if I haven’t won by the end of turn 12 the game will be deemed a Confederate victory.

The situation at the end of turn 8 (click on the image to zoom in).

Tuesday 22 July 2014

Henry Hill - turns 4–6

The Union battle-line continued to close in on the Rebels occupying Henry Hill but as each unit crossed the line of Young’s Branch they had to test to see if they became disordered and this had the effect of slowing down the advance. In the real battle Young’s Branch is not mentioned as being much of an obstacle and I was beginning to wish that I had made it so in this scenario!

The 69th N.Y. become disordered as they cross Young's Branch.

The 1st Minnesota come up behind the 79th N.Y. (who were also disordered crossing the stream).

As the Union troops struggled on towards the foot of Henry Hill, Early was bringing his brigade forward on the Confederate left so that the Rebel line now stretched unbroken to Chinn Ridge. Latham’s battery was deployed on Bald Hill where it started to bombard the troops on my right who had previously enjoyed the luxury of advancing unhindered by artillery fire.

Early's men move into the gap between Henry House and Chinn Ridge.

 The 5th Massachusetts decided to cross the stream in field column formation to avoid the possible disorder penalty and increase their movement rate.

Finally the two battle-lines were close enough for the Confederates to start blazing away with their rifled muskets and casualties started to mount in the Union ranks. A stationary unit with sufficient CP’s can fire up to 3 times per turn and Dave’s Confederates were soon using this ability to full advantage.

The Confederate line on the high ground opens fire on the advancing Union troops.

Having spent much of the battle trying to advance obliquely across Young’s Branch, the 13th N.Y. had suffered more than most from disorder and now as they finally emerged onto firm ground they found themselves under the muzzles of the guns of Imboden’s battery. The result was as you might expect – the 13th N.Y. became the first unit to skedaddle!

Sherman rides over to try and rally the 13th N.Y.

However, by one of those flukes that can happen in simultaneous movement games, their opposite number on top of Henry Hill – the 4th Virginia – chose the same moment to take the quickest road back to Richmond (to be fair though they had suffered a continuous drain of casualties from the fire of the 3rd U.S. artillery on Buck Hill).

 The 4th Virginia take to their heels and make off towards Richmond!

So, at the halfway point of turn 6, the battle is now in full swing and fairly evenly matched – my Union troops have 2 VP’s and Dave’s Confederates have 3 VP’s.

The situation halfway through turn 6 (click the image to zoom in).

Tuesday 8 July 2014

Henry Hill - turns 1–3

Before we could start playing we had first to dice for leader grades and unit experience levels for each of the infantry regiments present. The rules allow for 4 leader grades from ‘Poor’ through to ‘Bold’ and 4 experience levels from ‘Green’ to ‘Crack’. As this battle was supposed to be part of 1st Bull Run the die rolls were weighted towards the lower end of the experience levels and slightly favoured the Rebels (as a way of reflecting the ‘Jackson effect’). I was fortunate enough to end up with only 1 ‘Poor’ leader but 3 out of my 7 regiments were rated as ‘Green’.

"There stands Jackson - like a 15mm stone wall!" General Jackson with the 2nd Virginia at Henry House.

 Sherman's H.Q. behind Buck Hill.

We started the game with our front lines fully deployed and within artillery range of each other so there was little scope for any clever manoeuvring. I had no choice but to push Sherman’s brigade forward as quickly as possible to try and eject the Confederates from Henry Hill before their reinforcements could arrive. Franklin meanwhile was ordered forward in field column on my extreme right to come up behind the 79th New York.

The 1st US artillery move forward past the Stone House on the Sudley-Manassas Road. I first painted this Hovels model in a lovely grey and then discovered it should be a sandstone colour - grrrr!

 Franklin's brigade looks quite impressive but the 11th Mass (centre) have proved to be pretty unreliable.

All movement relies on Command Point usage and the number of CP’s allocated to each unit varies every turn on a die roll modified by the unit leader rating. This inevitably meant that some of my regiments moved faster than others and any attempt to keep the lines dressed soon had to be abandoned. This was especially true of Franklin’s command where the 11th Massachusetts lagged behind the rest of the brigade having failed to move at all on turn 1.

Sherman's brigade moves forward - more or less keeping in line.

Imboden's battery on Henry Hill engaging in some effective counter-battery fire against the 3rd US artillery. In the distance the skirmishers of both sides are hotly engaged.

 The 3rd US artillery on Buck Hill - the casualty figures denotes that the battery is disordered.

To add to my problems my flanking regiments soon had to cross Young’s Branch and both became disordered as they waded through the stream. This made movement even slower as disordered units must expend extra CP’s to manoeuvre. However, the Rebels were having a few problems too – not with movement but with some jittery trigger fingers in the ranks of the 4th Virginia who fired off 3 volleys whilst well out of range!

The 79th New York get their feet wet in Young's Branch.

Somehow, following a round of artillery fire, the 2nd Virginia managed to raise their morale level to 'Defiant' - perhaps it was the influence of the great man himself?

Early (living up to his name) emerges from the woods onto Bald Hill.

On turn 3 Dave was allowed to test to see if Early’s brigade had arrived. He needed a 5 or 6 to bring them on so I was hopeful he wouldn’t manage it - no such luck (he rolled a 5). With Early’s men now in position on Bald Hill I think we will be in for an interesting session next time that we play!

The situation at the end of turn 3 (1.30 pm) - click the image to zoom in.