Showing posts with label Gettysburg. Show all posts

Sunday, 3 February 2013

Gettysburg Day Two – Turns 5-8

The fighting resumed this week after a break imposed by the recent snow and the chilly conditions in the garage.
Barne's Division of V Corps moving up towards Devil's Den.

On surveying the battlefield again, I felt that the best course of action for the Federals was to consolidate and await reinforcements from V and II Corps. Trying to hold on to the Peach Orchard seemed hopeless now that my artillery had been routed so Sickles ordered Humphrey’s Division to withdraw and form a new defensive line at the Trostle House.

The Rebs take possession of The Peach Orchard

McLaw's Division moves forward between the Wheatfield and the Trostle House

Dave pushed McLaws men forward to occupy the Peach Orchard gaining a further half VP in the process. However, by now my guns and Carr’s Brigade had rallied bringing the overall Confederate VP score down to 1.5. I was confident that the worst was over and weight of numbers would soon halt the Rebels in their tracks.

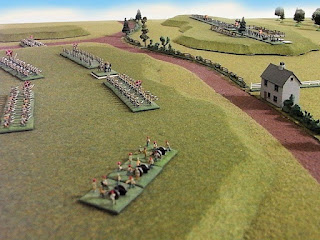
Union reinforcements on the Taneytown Road.

Crawford's Division of V Corps cross Plum Run near the Wheatfield. These lads are "green" but are welcome all the same.

Meanwhile Hood was continuing to press hard against my forces defending the Wheatfield and Devils Den. On the extreme right of the Confederate line Benning’s Brigade was ordered to assault Little Round Top but the timely arrival of Sweitzer’s Brigade from V Corps forced the Rebs to stop and deploy. Benning’s men charged and broke Sweitzer but the immediate danger to Little Round Top was relieved.

Sweitzer's broken Brigade behind Devil's Den.

Vincent's Brigade on Little Round Top didn't get to fire a shot all day.

By now Hood’s Division had taken control of the Wheatfield and had forced my artillery battery out of Devil’s Den, although they had been replaced by Tilton’s Brigade. Somehow the Confederates had clawed their way up to 4 VP’s and just one more broken Union Brigade would give them victory.

Birney's battery at Devil's Den, down to zero Strength Points and surrounded by enemy skirmishers.

Hood launched one Brigade in an unsuccessful assault on Devil’s Den and at the same time another of his Brigades in the Wheatfield broke and ran – with Union reinforcements finally on the scene it looked as if the crisis had passed. But then…

Tilton's Brigade break and run - game over!

…Law’s Brigade charged forward and ejected Tilton from Devils Den bringing the Confederate VP score to 5.5 (4 broken Union Brigades plus possession of The Peach Orchard, Wheatfield and Devil’s Den). With the Union VP score standing at just 1 a Confederate victory was declared.

Gibbon's Division on Cemetery Ridge were never engaged - their turn may come tomorrow!

It was a great scenario and a great game with well balanced victory conditions. It may seem strange to say that the Confederates won without taking Little Round Top but they had inflicted serious losses on the Union defenders with a much smaller force and it seemed like a fair result.

To view the map with initial dispositions click here.

Sunday, 13 January 2013

Gettysburg Day Two – Turns 1-4

I had a suspicion when I set up the terrain for this game that it was going to be an excellent scenario and I certainly wasn’t disappointed with our first playing session this week. The terrain on the Union left is quite dense with the Peach Orchard, Wheatfield, Trostle House, Devil’s Den and the Round Tops all packed into an area just three foot square. The rest of the table stretching away towards Gettysburg is more open and dominated by Seminary and Cemetery ridges, all of these features count as Victory Point locations in the game.

General view of the battlefield looking north from Devil's Den towards Cemetery Ridge on the horizon.

Sickles exposed line at the Peach Orchard. DeTrobiand's Brigade is in the foreground, Humphrey's Division is beyond the Peach Orchard. The white building to the left is the Sherfly House.

To win Dave needs to push Hood and McLaws forward rapidly and take as many of the VP locations on my left as possible before Union reinforcements start to arrive. Next he has to decide whether to try to take Cemetery Ridge with Anderson’s Division or bring him across to support Longstreet – the player with the most VP’s at 8.00pm (turn 16) will win if neither side breaks first!

Hood's initial deployment on the extreme right of the Confederate line.

There was very little I could do for the first couple of turns except watch nervously as Longstreet’s Corps advanced rapidly towards Birney’s strung out division on my extreme left. I attempted to close up the line but a couple of failed Command dice rolls put paid to that idea.

Hood closes in on Devil's Den and the solitary Union battery that is defending it.

The view from behind Hood's lines. The Rose House is centre left and the Wheatfield is centre right.

I was relieved however to see the advance guard of V Corps arriving on the Millerstown Road near Little Round Top and soon after them Hancock's II Corps put in an appearance on the Taneytown Road, although both had a lot of ground to cover before they could come to the aid of Sickle’s men.

Hancok leads II Corps south along the Taneytown Road - they have a long way to go to reach the scene of the action!

In the Peach Orchard my three artillery batteries were blazing away at McLaws Division as they closed up to the Sherfly House and prepared to assault. Barksdale’s Brigade in the lead were taking heavy casualties but they continued to move forward and (with a “6” rolled for morale) succeeded in assaulting and breaking the gun line. At the same moment Wofford engaged with DeTrobriand who, worn down by Rebel artillery and skirmisher fire, also broke and ran leaving the Union left wide open.

There can't be many peaches left on those trees! Barksdale (by the Sherfly House) and Wofford (foreground) engage Birney's Division who start to melt away.

Meanwhile Hood’s Division had pressed forward right up to the Wheatfield and Devil’s Den where the sole defenders were Ward’s Brigade and a battery of 12pdrs. The guns in Devil’s Den continued firing defiantly as the sea of grey closed around them but the situation was desperate despite the fact that reinforcements were now in sight.

Looking east from behind the Confederate lines. In the distance you can see Union reinforcements from V Corps deploying on to Little Round Top. Meanwhile Rebel artillery is in action in the Wheatfield.


Hood's heavy skirmish line engulfs the lone battery of 12pdrs in the "Devil's Ornamental Garden" (so called because we didn't feel that a few bits of gravel and lichen gave quite the dramatic effect we had hoped for!).

During all this excitement on the left very little was happening over on my right flank. This was because the scenario rules prevented Gibbon from firing upon Anderson unless he was directly threatened. However, this didn’t stop Anderson’s guns from pounding away at Humphrey’s Division in front of the Trostle House and soon Carr’s Brigade was added to the list of broken Union Brigades.

Anderson's Grand Battery plays on Humphrey's Division at the Trostle House (out of shot to the right) whilst Gibbon looks helplessly on from Cemetery Ridge.

So, at the end of turn 4 I have two broken infantry brigades (2 DM points) and three broken artillery batteries (1.5 DM points) giving a total demoralisation score of 3.5. Break point for my army is 5 points and if the Rebs are able to take the Peach Orchard, Wheatfield and Devil’s Den before any of my men can rally, it will be game over!

Sunday, 30 December 2012

Gettysburg Day Two - Scenario


We are planning this 6mm refight with historical OOB’s, timescale and deployments, and it promises to be a very different affair to the two day slugging match of Chancellorsville, our last game ! The scenario will be balanced on a knife edge, and the outcome will probably by determined by what happens in the first  3 or 4 turns. If the Confederates get the upper hand quickly then Sickles' Corps may collapse like a pack of cards – but if even a couple of his brigades can offer serious resistance then the flow of Union reinforcements should turn the tide in their favour.

Ian has 21 brigades available from three different corps ( most starting off table), and I have only 13. To create game balance Union brigades are 7 strength points against 9 strength points for the Confederates, who also begin the game  with strong skirmish lines (skirmishers usually have to be ‘bought’ with strength points in our rules). All the famous geographical locations are VP sites that affect Union army demoralisation while held by the Confederates.

Anderson’s division on Seminary Ridge will be fixed in position for a random amount of time to simulate Anderson’s late involvement in the days events. Opposite him on Cemetery Ridge Gibbon’s Union division will be similarly fixed until attacked. Union reinforcements will arrive at the numbered entry points.


Click on map to enlarge.

Wednesday, 12 December 2012

Gettysburg Day Two - Map

This is the plan of the table layout for our next American Civil War game. The game will be based on the second day at Gettysburg and will feature Longstreet's attack on the Round Tops. Dave will play Longstreet and I'll be playing the various Union defenders, should be a good one!


Click on the image for a closer look.