Sunday, 5 May 2013

The Battle of Cutler’s Farm

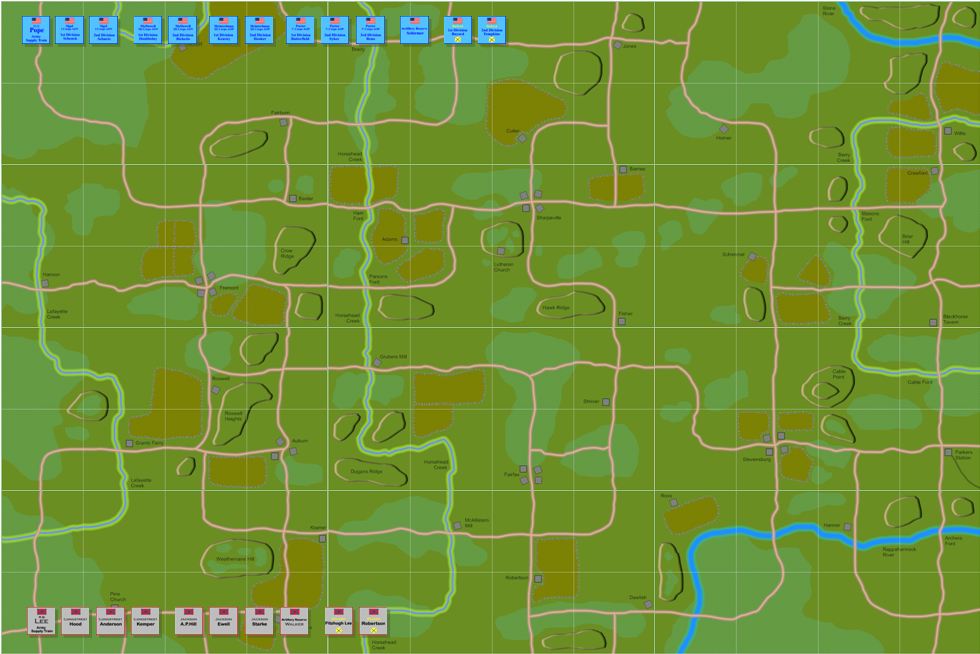
Following Lee’s move towards the Union left flank we now have another battle about to begin in the area of Cutler’s Farm. So, although our campaign map is made up of 96 squares, we have somehow contrived to bring on the next battle very close to the site of the last one!

 The battlefield - click the image to zoom in.

 Sharpeville - looks familiar eh? 
 
 The Barnes farm - poor old farmer Barnes must have thought the worst was over!
 
Cutler's Farm - looking northwest.

 View from the Horner farm looking due west across the battlefield.

The action starts at 8.00am on 2 August 1862 with a contact between Porter and Longstreet just to the north of the Barnes Farm. Unusually in this one the North will be coming in from the South and the South from the North. A victory here would give the Union enough VP’s to win the Campaign so the stakes couldn’t be higher.

For the story of how we got to this point take a look at our individual Campaign diaries Wilderness Tavern and Road to Appomattox.

Saturday, 13 April 2013

The Battle of Sharpeville - Conclusion

Our session on Wednesday night was short but sweet finishing a game that will go down in history as a great day for the North and taking us one step closer to the restoration of the Union!

General view of the north side of the battlefield looking west through Jackson's lines towards Sharpeville.

General Lee returned to the field with the air of a beaten man and this immediately lifted spirits at Pope’s HQ. I had felt that, although Dave was trailing 4 to 2 in DM points at this stage, the battle could still turn in an instant, particularly with two whole Rebel Divisions committed to assault my right flank at Hawk Ridge.

Pope's HQ at Sharpeville - the numbered counter by the courier shows he is about to leave with "Order No4", this
system helps us keep track of any orders issued by the C-in-C.

The Rebel position on top of Hawk Ridge looking towards the Union lines. The Rebs are finally bringing up some guns!

Turn 8 saw the fierce fighting at the Barnes Farm continuing with more heavy casualties caused to both sides. Hooker’s Division was barely combat effective by now and Kearny was in little better shape. The Rebels were weary too yet somehow the opposing battle-lines hung on with no further routs.

AP Hill's men slug it out with Kearny's Division in the fields around the Barnes Farm.

Jackson's line viewed from the south - Ewell is in the foreground (note the Brigade with the "1" SP marker - many of the Brigades on both sides were reduced to very low levels by now).

It was over on the Rebel left flank that things were about to be decided. Dave was still pushing Anderson and Kemper forward against McDowell’s line but they were receiving deadly canister fire and the end of Anderson's line was flanked by Tompkin’s dismounted cavalry. All this hot lead proved too much for the men in butternut and grey and with a string of failed morale tests they broke and ran!

The central part of the field looking west. Hood's Division (nearest the camera) are still in reserve and awaiting orders.

Anderson's flank on Hawk Ridge is "up in the air" and Tompkin's troopers are blazing away at it with their carbines while infantry skirmishers have sneakily worked their way into the enemy's rear!

Kemper's men take to their heels (their General has already been carried from the field with a mortal wound).

A quick count of broken units revealed a Confederate score of 6, enough to put them at their Army Demoralisation Level and so a Union victory was declared. The Battle of Sharpeville was over and to the cheers of his men General Pope claimed his 5 Campaign VP’s.

Another view of Kemper's men on the run - well it was my turn to choose the photos!

So what went wrong for General Lee? Well, of course President Davis will be holding a full enquiry but from the Union perspective it looks as if Dave’s ‘Porteritis’ cost him the battle. He kept a full 8 Brigades in reserve to counter a threat that didn’t exist allowing a numerically smaller Union army to succeed. He also failed to bring more than a handful of artillery pieces into play being hampered by the terrain whilst Pope managed to pound the Rebels continuously from both long and short range.

McDowell's batteries in action at the foot of Hawk Ridge. These lads broke the back of the Confederate assault.

Hood's men again - probably whistling Dixie but not doing much else!

The Confederates must now withdraw from the field and the strategic Campaign turns will continue. Don’t forget to follow our individual blogs Wilderness Tavern (Dave) and Road to Appomattox (me) to keep up with events.

Monday, 1 April 2013

Battle of Sharpeville - Turns 5-7


As the second session began, Jackson was under serious pressure.  A.P. Hill’s men on the far right were being  forced to give ground, but Lee was still in the grip of the fear that Porter’s Corps was about to descend on the Confederates from a position off-table to the north, and continued to order the bulk of the reserves held back for this (increasingly unlikely!) eventuality. He did, however, send Walker’s three rifled batteries trundling off down a woodland track to attach themselves to Jackson’s command. 
Stuart's troopers (foreground) and Jackson's reserve stubbornly continue to face north -
waiting for a flank attack that will never come ! The rifled batteries can be seen arriving in the rear.

Ian and I have fought dozens of play-by-email campaigns using the brilliant range of ACW games sold by HPS. We have often noticed how total fog of war over huge strategic areas and timescales has the psychological effect of crippling you with caution. You start to vastly overestimate your opponents strength, cunning and manoeuvreability - we call this affliction ‘McClellanitis’ ....  and by now I was seriously suffering from it on the field of Sharpeville. I was so convinced that Porter was about to outflank me that I had utterly failed to notice that his corps had already arrived on the table in the Union rear, and was marching calmly through the town to join the main action ! Being under no obligation to identify this force to me, Ian was extremely amused at my discomfiture.


It wasn't until the final division of Porter's corps (Sykes) passed through Sharpeville
 on it's way to the front, that I correctly identified them !

It was too late of course. Scared of phantoms, I had held back a division from each of my corps and was paying the price. Jackson managed to fall back a little and re-align, shunting fresh brigades into the line and retiring threadbare ones – but he was  badly mauled.

Kearny's brigades push Jackson hard ....
.... and the flank begins to buckle under the strain.

To the south at Hawk Ridge Longstreet ran into a solid wall of fire from McDowell’s divisions, Doubleday and Ricketts. Heavy  losses  and crumbling morale meant that he couldn’t press home any of the assaults his orders had required. After a confident start the Rebs have lost the initiative and are fighting for survival.
Looking west with the Lutheran church in the centre background - Longstreet
 ploughs into McDowell where the road winds past Hawk Ridge.
Looking north from the ridge as the battle lines close.


.... and it starts to go badly for the Rebs
( a lesser man might start bleating about unfavourable dice at this point...)

As more and more Union forces flood onto the field, Lee has ordered Hood’s division up to plug the gap between Jackson and Longstreet. The Confederates already have 2 brigades permanently eliminated from play and 2 more broken on table, giving them a demoralisation level of 4 at the end of turn seven.

The Army of Northern Virginia headquarters.
 Lots of awkward silences and uncomfortable foot shuffling.
Thankfully the Easter break will delay the final resolution of this battle, and draw a temporary veil over Southern embarrassment . . . .

Sunday, 24 March 2013

Battle of Sharpeville – Turns 1-4

We had hoped that by playing a mini campaign we would end up with an interesting table battle, the sort of scenario one would never dream up normally, and we’ve certainly not been disappointed. When we finally laid out our respective forces on the table on Wednesday night we were both in for a bit of a surprise!

The view from behind Jackson's lines looking west towards
Heintzelman's position in front of Sharpeville.

For me it was the horrible realisation that Longstreet’s Corps was not off-table (as I had hoped) but was fully assembled east of Hawk Ridge. I had completely failed to detect its presence in the run up to the battle. For Dave it was the sight of my Artillery Reserve (4 rifled batteries) already deployed in range and ready to start bombarding Ewell’s battle-line.

Part of Longstreet's Corps (Anderson and Kemper) drawn up in column on
Jackson's flank. The Barnes Farm is just visible on the skyline.

The Union Artillery Reserve were already in range of Jackson's lines at the
start of play. They caused some serious damage to Ewell's Division 
(the dice are there to record ammunition usage).

The game got off to quick start because I had already issued orders to Heintzelman’s Corps to advance and engage Jackson’s forces near the Barnes Farm. This area was the “contact” terrain square in the campaign game and, as were aware of each others presence, we were able to start play with orders already issued to our troops.

Kearny's Division of Heintzelman's Corps start to advance
through the fields of the Barnes Farm.

The view along Jackson's line at the start of play
(Ewell on the left and A P Hill on the right).

I think Dave was a bit surprised by my sudden advance and this reinforced his paranoia that Porter’s off-table Corps was about to fall on his right flank. This gave me a slight psychological advantage that I played to throughout the evening although it didn’t change the fact I was starting the game with 12 Brigades against 24!

Part of A P Hill's Division was angled back to protect against any
flanking movement. Robertson's Troopers were also present
as was the great JEB Stuart himself (foreground).

The presence of my Artillery Reserve (deployed south-east of Sharpeville) helped to make up for my lack of numbers as the two battle-lines engaged. The guns could not fire using our “Grand Battery” rule because my artillery commander was off-table with the supply train (in our rules only guns firing under the direct command of the artillery commander may fire in “Grand Battery” forcing morale throws for units hit) but they still managed to lay down an effective fire on the Confederate front line.

The Union Supply Train arrives in Sharpeville - no ammunition can
be distributed until a Wagon Park has been established.

The fighting around the Barnes Farm was intense right from the start with both sides taking heavy casualties. On one occasion A P Hill himself was seen on the Rebel front-line steadying the men (it’s unusual to see Confederate Generals in such a forward position!) while Fighting Joe Hooker was doing the same on the Union side. Hooker risked himself once too often and was carried from the field wounded (quite a loss as he was “A” rated in this campaign!).

Hentzelman's battle-line at the Barnes Farm
(Kearny on the left, Hooker on the right).

Hooker on the firing-line (the card counter under his command base notes
the current order mode of the Division - in this case "ENGAGE").

Meanwhile, a mile or so to the south, McDowell was starting to deploy his Corps on the right flank of Heintzelman. This was fortunate because it put his command square in the path of Longstreet’s advancing Corps. McDowell was also about to be joined by Tompkin’s Cavalry Brigade who had ridden across the field to lend their support.

McDowell's Corps leaving Sharpeville on their way towards Hawk Ridge.

Longstreet's Corps begin their advance past the Fisher Farm.

So, at the end of the 12.30pm turn we still have plenty of action around the Barnes Farm and a new fight brewing near Hawk Ridge. All the Rebel forces are on table (except for Fitzhugh Lee’s Cavalry) and, although another Union Corps is arriving at Sharpeville, three other Union Division are still off-table – could Porter be about to fall on Jackson’s flank? Dave doesn’t know for sure but of course I do and so do you if you’ve been following our campaign diary blogs Road to Appomattox and Wilderness Tavern.

We hope to continue play next week
To view the battlefield map click here.

Monday, 18 March 2013

The Battle of Sharpeville - 1st August 1862

This is the map for the forthcoming "Battle of Sharpeville" (click the image to zoom in).


If you've missed the story of the build up to this encounter you should check out Wilderness Tavern (Dave's Confederate campaign blog) and Road To Appomattox (My Union campaign blog).

The battle starts at 11.00am on 1st August 1862 which gives us 16 turns until nightfall. As strategic attacker the onus is on Pope to get things rolling but somehow I doubt that Lee will be sitting tight so expect the unexpected with this one!

The fun should begin this week...

Tuesday, 5 March 2013

The Sharpeville Campaign

The map and units
A new ACW mini-campaign about to begin - we plan to manoeuvre strategically on this map in the hope of getting one or two decent table battles out of it ! It is really a way of testing a new idea for campaign mangement, because concealed movement is always a difficult issue without an umpire. I downloaded a nice (free) map drawing program called 'Mapping Board' and created a jpeg of the map, embedding it in a Word document. The unit markers are simply Word text boxes, containing their own jpeg graphics, which can be easily moved around on top of the map, and more importantly can be rendered invisible by adjusting their 'transparency' option. Instant concealed movement!


Example Union units
Setting the magnification to 300% brings the map and units into glorious high definition. The campaign is totally fictitious but the OOB's are roughly based on 2nd Bull Run ( Lee & Jackson vs Pope) and the map units represent every model we can actually field on the tabletop. The squares used for map movement are also the individual 2' terrain squares that we own, in configurations whereby any 8' by 4' layout can be reproduced accurately. Victory points are won mostly by table battles, with a couple of towns being worth points to the Rebs.


Confederates
We have worked out a brief set of rules for manoeuvring on the map that should hopefully tie in with our tabletop rules, but we may have to play it by ear a bit ! If anyone is interested in watching us play this out from both perspectives, Ian will post some of Pope's movements, plans, tactics and embarrassing blunders on his Road To Appomattox blog and I will post Lee's over on my blog Wilderness Tavern. The action should start soon . . . .

Sunday, 3 February 2013

Gettysburg Day Two – Turns 5-8

The fighting resumed this week after a break imposed by the recent snow and the chilly conditions in the garage.
Barne's Division of V Corps moving up towards Devil's Den.
On surveying the battlefield again, I felt that the best course of action for the Federals was to consolidate and await reinforcements from V and II Corps. Trying to hold on to the Peach Orchard seemed hopeless now that my artillery had been routed so Sickles ordered Humphrey’s Division to withdraw and form a new defensive line at the Trostle House.

The Rebs take possession of The Peach Orchard

McLaw's Division moves forward between the Wheatfield and the Trostle House

Dave pushed McLaws men forward to occupy the Peach Orchard gaining a further half VP in the process. However, by now my guns and Carr’s Brigade had rallied bringing the overall Confederate VP score down to 1.5. I was confident that the worst was over and weight of numbers would soon halt the Rebels in their tracks.

Union reinforcements on the Taneytown Road.

Crawford's Division of V Corps cross Plum Run near the Wheatfield. These lads are "green" but are welcome all the same.

Meanwhile Hood was continuing to press hard against my forces defending the Wheatfield and Devils Den. On the extreme right of the Confederate line Benning’s Brigade was ordered to assault Little Round Top but the timely arrival of Sweitzer’s Brigade from V Corps forced the Rebs to stop and deploy. Benning’s men charged and broke Sweitzer but the immediate danger to Little Round Top was relieved.

Sweitzer's broken Brigade behind Devil's Den.

Vincent's Brigade on Little Round Top didn't get to fire a shot all day.

By now Hood’s Division had taken control of the Wheatfield and had forced my artillery battery out of Devil’s Den, although they had been replaced by Tilton’s Brigade. Somehow the Confederates had clawed their way up to 4 VP’s and just one more broken Union Brigade would give them victory.

Birney's battery at Devil's Den, down to zero Strength Points and surrounded by enemy skirmishers.

Hood launched one Brigade in an unsuccessful assault on Devil’s Den and at the same time another of his Brigades in the Wheatfield broke and ran – with Union reinforcements finally on the scene it looked as if the crisis had passed. But then…

Tilton's Brigade break and run - game over!

…Law’s Brigade charged forward and ejected Tilton from Devils Den bringing the Confederate VP score to 5.5 (4 broken Union Brigades plus possession of The Peach Orchard, Wheatfield and Devil’s Den). With the Union VP score standing at just 1 a Confederate victory was declared.

Gibbon's Division on Cemetery Ridge were never engaged - their turn may come tomorrow!

It was a great scenario and a great game with well balanced victory conditions. It may seem strange to say that the Confederates won without taking Little Round Top but they had inflicted serious losses on the Union defenders with a much smaller force and it seemed like a fair result.

To view the map with initial dispositions click here.